Core practical 7: plant tissues under the light microscopeSpec 4.6
In short
A plan diagram shows the arrangement of tissues in a section using clear lines, without drawing individual cells. A high-power drawing shows the cells of one tissue. Thin sections are cut, stained, mounted and viewed with a light microscope, and the magnification of a drawing is calculated from image size divided by actual size.
Core practical 7: use a light microscope to make observations, draw and label plan diagrams of transverse sections of roots, stems and leaves; draw and label cells of plant tissues; and identify sclerenchyma fibres, phloem, sieve tubes and xylem vessels and their location.
Preparing a section
- Use a sharp razor blade or scalpel to cut a very thin transverse section of the stem, root or leaf. Cut away from your fingers, and place the blade in a sharps container or as directed after use.
- Float the sections in water in a dish. Choose the thinnest, most complete section with a fine paintbrush.
- Stain: toluidine blue stains lignified walls blue-green; phloroglucinol with hydrochloric acid stains lignin red. Treat hydrochloric acid as corrosive and wear eye protection.
- Mount on a slide in a drop of water or stain. Lower a coverslip at an angle, using a mounted needle, to avoid trapping air bubbles.
- Start with the lowest power objective, focus with the coarse focus and then the fine focus, then move to a higher power for detail.
Plan diagrams
- Draw with a sharp pencil, using clean single lines, with no shading and no colouring.
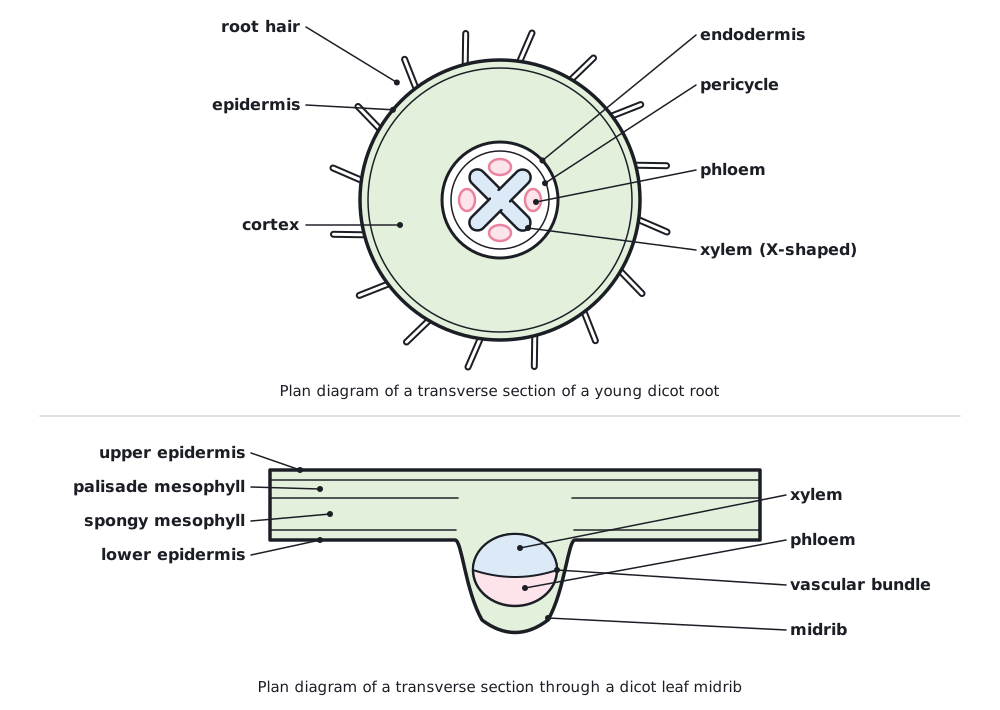
- Draw the outline of the whole section and the boundaries between tissues. Do not draw individual cells.
- Make the drawing large (using at least half the page) and in proportion.
- Label with straight lines ruled from the structure, not crossing each other, with a title, and record the magnification.
| Section | Tissues to outline and label |
|---|---|
| Root | Epidermis (with root hairs), cortex, endodermis, and a central vascular cylinder with xylem in a star or cross shape and phloem between its arms |
| Stem | Epidermis, cortex, a ring of vascular bundles (xylem on the inner side, phloem outside it, sclerenchyma cap outermost) and central pith |
| Leaf | Upper and lower epidermis, palisade mesophyll, spongy mesophyll, and the midrib vascular bundle with xylem on the upper side and phloem on the lower side |
Drawing cells of a tissue
Use a higher power objective and draw a small number of cells in one tissue with a continuous line, showing the cell walls, lumen and contents. Show thick walls as double lines. Identify the tissues from their appearance.
- Xylem vessels: large circular lumens, no contents, thick walls (stained blue-green or red by lignin stains).
- Sclerenchyma fibres: small lumens, very thick walls, in groups outside the phloem.
- Phloem: thin-walled; sieve tubes are larger and empty-looking, with companion cells smaller and with dense cytoplasm beside them. In a longitudinal section a sieve plate may be visible.
Calculating the magnification of a plan diagram
A student's plan diagram of a stem section is 96 mm wide. The real section, measured using an eyepiece graticule that was calibrated with a stage micrometer, is 3.2 mm wide. Calculate the magnification.
- Both lengths must be in the same units: 96 mm and 3.2 mm.
- magnification = 96 ÷ 3.2
Answer: ×30
To find the real size from a drawing, rearrange: real size = image size ÷ magnification. Convert units first: 1 mm = 1000 µm.
 (opens full size in a new tab)
A plan diagram must not show individual cells, and labels must not cross. Both are common ways to lose marks.
Written and checked against the Edexcel International A Level Biology (YBI11) specification · Updated October 2026